Saturday, October 30, 2021

Assembling a self-supporting masonry dome

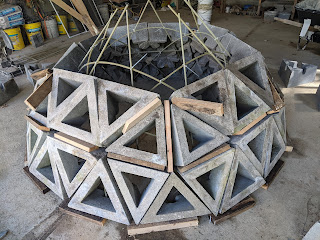
Here are the basic steps to assemble a first frequency truncated icosahedron from 'pent' and 'hex' concrete block, as provided by Spherical Block. Trace out a circle of radius 3 ft. 1 inch.  Arrange the block in a five-fold, or pentagonal pattern, one pent, two hex, [repeat 5X]. Arrange all blocks with tips pointing up. 


Next, place blocks with tips pointing down, two pent, one hex, [repeat 5X]. FRP, Fiber Reinforced Plastic rebar is used here, #3, or 3/8 inch diameter. Rebar is 8 ft. 10 inches, and goes from center hex block and is easily bent  past two pent and into the next center hex, as shown. 


Additional rebar is provided horizontally, as shown. Length is 41 inches. Rebar is secured with zip ties, to help align the structure.

Hex block are placed, tip pointing up, as shown.  

Because this is a first frequency structure, and is made from block designed for a second frequency structure, wooden shims were used during this dry-stack assembly.  This gave the blocks the increased 'wedge' required for first order arrangement. When using mortar, the mortar will be tapered for a first frequency dome; thicker outside.


Additional rebar are placed vertically, as shown, attached with zip ties. These are also 41 inches long. Additional pent blocks are placed, as shown


Two more hex blocks are placed, tips down, as shown.


An additional course of hex block are added, as shown.


Finally, 5 pent blocks are added to the top and final course. All of these block edges would be in close alignment if this were mortared together. Assembly occurs without any additional support scaffolding or centering. This first frequency dome has an outer diameter of around 8 ft.


The first frequency test was easily disassembled.  A second frequency dome is now being assembled.

Here are the same basic steps, except that the radius is doubled and 4 times as many block are used. This second frequency dome has an outer diameter of around 16 feet. 2 pent, 4 hex, 5X, etc., tips up.


And so on. It is all self-supporting as it is assembled. Larger domes of higher frequencies can also be made, all from the same block.

Friday, September 3, 2021

Floor, walls and bond beam

 This material is based upon work supported by the National Science Foundation under Grant No. 1660075 ("Topological interlocking manufactured concrete block").  Any opinions, findings, and conclusions or recommendations expressed in this material are those of the author, and do not necessarily reflect the views of the National Science Foundation.

The previous post showed how we excavated, poured the footer and built the stem wall.  Following this, the vertical walls were assembled and the floor was installed. The floors are made to accommodate a radiant heating system. First a rigid foam is laid down, on the level compacted ground floor; then "Pex" TM pipe was installed.  


Concrete was then poured on top of the foam and pex, and screeded level, then the floor surface was floated. 


The walls were built up to header height, then a temporary scaffolding was built for roof assembly.  All exterior doorways had a masonry arch built over them, using wooden forms. The arches are fast and easy to assemble, they are also inexpensive.


After all the vertical walls were assembled, forms were built at the top of these walls; rebar was placed in this cavity as per the PE specification, and the form was poured with concrete to create a reinforced bond beam. 


With the bond beam made, roof construction was about to begin.  That's what I'll describe and show next..

Wednesday, September 1, 2021

Excavating and making a foundation for a test building

This material is based upon work supported by the National Science Foundation under Grant No. 1660075 ("Topological interlocking manufactured concrete block").  Any opinions, findings, and conclusions or recommendations expressed in this material are those of the author, and do not necessarily reflect the views of the National Science Foundation.

My company was awarded a Phase II funded project by the National Science Foundation.  The main objective of this work was to demonstrate our innovative masonry systems, and to obtain a positive evaluation report from the International Code Council- Evaluation Services. In order to achieve this, it was strongly suggested by ICC-ES that we work with a Registered Design Professional architect and a licensed Professional Engineer to design and build a test or sample building for the purposes of evaluation.

We began with the building design, in consultation with Robert Ferry, RDP, AIA and Cheng-Ning Jong, PE. The basic approach was to keep the entire structure under compression, being squeezed together, which is how masonry is strongest.  We incorporated several different types of arches, domes and half-domes, configured with flying buttresses.


Work began with excavation for the footer.  This work was done room by room, in sequence, simply so we had a place to put all the excavated dirt while we worked.


The footer had its reinforcement rebar detailed by the PE. All footer sections used formwork to establish dimensions. Rebar laid flat, horizontally, was tied to the vertical rebar which would go up into the walls.  This was done using ninety-degree elbows of rebar. All rebar was “Gatorbar” basalt-based Fiber Reinforced Polymer rebar, which is lightweight, stronger than steel in tension, and never rusts.  This rebar also bends easily to provide curves for arched roofs.


Once the footer was poured, stem walls were built to make the foundation come up to grade, where the vertical walls began, above grade.


After the stem walls were built, the floor was filled back in with the excavated earth and compacted to a solid mass.


My next blog entry will talk about the next steps in construction.